Need to pay multiple people at once? Read through these simple steps on how to set up a Group Payment.
What's a Group Payment
Previously known as a Schedule / Batch Payment, Group Payments allow you to pay multiple people and/or organisations at one time, for example your company payroll.
How to view Group Payments
- Click on the Payments menu
- Select Pay a group
- You will see two tabs
- All: View all your group payments and their status
- Templates: View saved templates. Templates are a saved set of payees that you can reuse
- From the All tab you have two options for creating a Group Payment
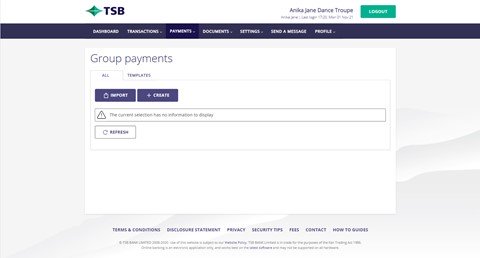
- Import: Upload a file of payees to make a payment
- Create: Either select a saved template or create a new group payment by entering your payees manually
How to make a Group Payment
How to create a Group Payment from a file
- Click on the Payment menu
- Select Pay a group
- When viewing from the All tab, select the Import button
-
Choose from the following file types:

- Direct credit schedule
- ASB direct credit schedule
Please Note: See the attached for details on our accepted payment schedule formats.
- Click Select File to upload your file from your computer
- Click Import
- Enter the description for your group payment. This will be the reference that shows on statements and your transaction list
- Then use the drop-down menu to select the account that you would like the payments to come from
- Select the date that you'd like to make the payment. You can either make the payment straight away or schedule it to be processed at a later date
- If you would like a summary of the transaction for your records, tick the box and enter the email address that you would like the summary to be sent to
- The review page gives you a chance to check over everything before you confirm the group payment and make any changes.
- If you're happy with all the details you can confirm the payment. You'll be prompted to authenticate the payment by the method you've chosen (eg SMS or security token). Once authenticated, the payment will be processed on the payment date that you have selected.
How to manually set up a Group Payment
- Click on the Payment menu
- Select Pay a group
- When viewing the All tab
- Click the Create button
- Enter the description for your group payment. This will be the reference that shows on statements and your transaction list
- Then use the drop-down menu to select the account that you would like the payments to come from
- Select the date that you'd like to make the payment. You can either make the payment straight away or schedule it to be processed at a later date
- Select the people that you'd like to pay. If you don't already have them as payees, you'll need to set them up now
- As you're adding payees to the payment, double-check that the particulars, code and reference is correct
- Enter the amount that you'd like to pay each person
- If you'd like a summary of the transaction for your records, tick the box and enter the email address that you would like the summary to be sent to
- The review page gives you a chance to check over everything before you confirm the group payment and make any changes.
- If you're happy with all the details you can confirm the payment
- You'll be prompted to authenticate the payment by the method you've chosen (eg SMS or security token). Once authenticated, the payment will be processed on the payment date that you have selected.
Tip: If this is a group payment that you're going to make regularly, you can choose to save the payment as a template so that you can quickly make the payment again in the future, without having to set it up again.
What's a Group Payment Template?
A group payment template is a saved set of payees that you pay regularly.
How to view Group Payment templates
- Click on the Payment menu
- Select Pay a group
- You will see two tabs
- All: View all your group payments and their current status
- Templates: View templates you have saved. Templates are a saved set of payees that you can reuse
- Select the Templates tab
- You will see the following:

- Import: upload a file to be saved as a Group Payment template.
- Create: create a new Group Payment template.
- Description: name your group payment template
- Action menu (the 3 dots): gives you the following options
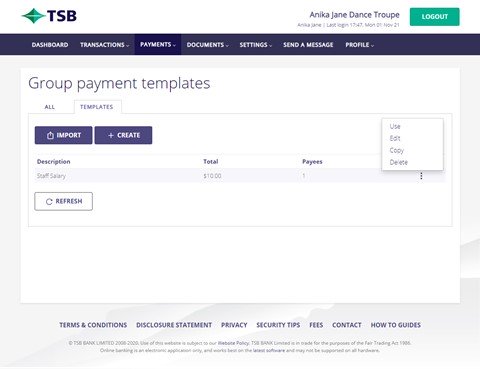
- Use
- Edit
- Copy
- Delete
Create a Group Payment Template manually
- Click on the Payment menu
- Select Pay a group
- Select the Templates tab you have the following two options for creating a new Group Payment template
- Click Create
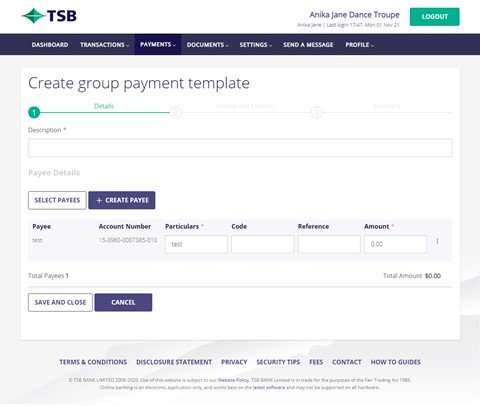
- Enter a description for your payment template, this is your reference.
- Select the payees you want included in the template
- Enter the particulars, code and reference for each payee
- Enter an amount for each of your payees or leave blank to be filled in when you use the template
- Make the changes you want to make and click Save and close
- The template will show in the list on the templates tab
Import a Group Payment Template
- Click on the Payment menu
- Select Pay a group
- Select the Templates tab
- Click Import button
-
You will be taken to a new screen where you are asked to choose from the following file types:
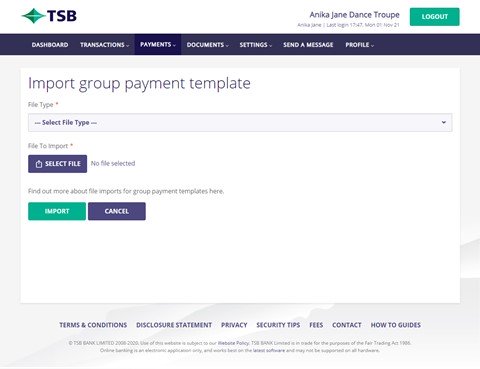
- Direct credit schedule
- ASB direct credit schedule
Please Note: See the attached for details on our accepted payment schedule formats.
- Click Select File to upload a file from your computer
- Click Import
- Enter a description for your payment template, this is your reference.
- Check the list of payees and their details, then click Save and close
- The template will show in the list on the templates tab
Using a Group Payment Template
- Click on the Payment menu
- Select Pay a group
- You will see two tabs
- All: this is where you will see all your group payment and their current status
- Templates: this is where you can see any templates you have saved. Templates are a saved set of payees that you can reuse.
- Select the Templates tab
- Click the action menu (the 3 dots) next to the Payee that you would like to use and click Use
- Select the date that you'd like to make the payment. You can either make the payment straight away or schedule it to go out at a later date
- If you'd like a summary of the transaction for your records, tick the box and enter the email address that you would like the summary to be sent to
- The review page gives you a chance to check over everything before you confirm the group payment
- If you're happy with all the details you can confirm the payment. If there's something that you'd like to change, you can do this now
- Then you'll need to authenticate the payment by the method that you use. This could be an SMS or security token. Once authenticated, the payment will be processed on the payment date that you have selected
Edit a Group Payment Template
- Click on the Payment menu
- Select Pay a group
- You will see two tabs
- All: this is where you will see all your group payment and their current status
- Templates: this is where you can see any templates you have saved. Templates are a saved set of payees that you can reuse.
- Select the Templates tab
- Click the action menu (the 3 dots) next to the Group Payment Template that you would like to edit and edit
- Make the changes you want to make and click Save
Copy a Group Payment Template
- Click on the Payment menu
- Select Pay a group
- You will see two tabs
- All: this is where you will see all your group payment and their current status
- Templates: this is where you can see any templates you have saved. Templates are a saved set of payees that you can reuse.
- Select the Templates tab
- Click the action menu (the 3 dots) next to the Group Payment Template that you would like to copy and click Copy
- Make the changes you want to make and click Save
Delete a Group Payment Template
- Click on the Payment menu Select Pay a group
- You will see two tabs:
- All: this is where you will see all your group payment and their current status
- Templates: this is where you can see any templates you have saved. Templates are a saved set of payees that you can reuse.
- Select the Templates tab
- Click the action menu (the 3 dots) next to the Group Payment Template that you would like to delete and click Delete
- Click Confirm on the pop-up window to action the removal
How to create, edit and delete payees
Payees are a saved set of payment details that you can reuse when you make payments. There are three different types of payees you can create.
- Payees - this type of payee is used to save payment details entered for making a payment to an individual person.
- IRD / Tax payees - this type of payee is used to save payment details entered for making an IRD / Tax payment
- Company Payees - this type of payee is used to save payment details entered for companies who have their payment details registered with the Bank.
How to add a payee
- Click Payments from the menu at the top
- Then select Saved payees
- Click Add Payee
- Enter the required details which are:
- Payee name
- Account details
- Reference
- Click Create to save the payee details
How to add a payee for IRD/tax payments
- Click Payments from the menu at the top
- Then select Saved payees
- Click Add Tax Payee
- Enter the required details which are:
- IRD Number
- Tax Type Code (select the tax type code that you want to make a payment to. If you aren't sure which tax type to choose visit Inland Revenues website for details.)
- Nickname (Give the payee a nickname or name)
- Click Create to save the payee details
How to add a payee for company payments
- Click Payments from the menu at the top
- Then select Saved payees
- Click Add Company Payee
- Search for the company by typing in the first few letters of the company name to get suggestions and then select the company from the drop down
- Enter the required details. Each company requires different details, please follow the instructions for the payee that you have selected
- Click Create to save the payee details
Please note: Only pre-registered companies will appear in the drop-down list. If the company you are searching for does not appear, then you would need to make a personal payment instead of a company payment.
How to edit a payee
- Click Payments from the menu at the top
- Then select Saved payees
- Click the action menu (the 3 dots) next to the Payee that you would like to edit and click Edit
- Edit the payee details and click Update to save the new details
Please note: Any changes made to a payee will not apply to the payments you have previously created using this payee. If you have setup scheduled payments or future dated payments for this payee, you will need to edit the payment or delete and create a new one.
How to delete a payee
- Click Payments from the menu at the top
- Then select Saved payees
- Click the action menu (the 3 dots) next to the Payee that you would like to delete and click Delete
- Click Confirm on the pop-up window to action the removal
Please note: To delete a payee that you have scheduled payments or future dated payments setup for, you need to either wait for your payments to be processed or alternatively delete the payments.